Saturday, May 18, 2013

What is an AFCI ? (Arc Fault circuit Interrupts)

What is an AFCI? (Q&A)

Arc Fault Circuit Interrupters (AFCIs) are required by the National Electrical Code for certain electrical circuits in the home. Below are some frequently asked questions about AFCIs and the benefits of installing them in your home.
What is an Arc Fault?
Why do we really need Arc Fault Circuit Interrupters (AFCIs)?
How is an Arc Fault detected?
How does an AFCI work?
Type of AFCIs:

Branch/Feeder
Combination
AFCI and GFCI Protection
What is the difference between and AFCI and Ground Fault Circuit Interrupter (GFCI)?
Are there any wiring and installation guidelines?
What is the price of the new safety technology worth?
Why is it important to have an AFCI Breaker installed in your home?
Where are they required to be installed by the National Electrical Code?
Can I have AFCIs installed even if my state or municipality doesn’t require them?

What is an Arc Fault?
Most people are familiar with the term arcing. Arcing may be intended, such as with an arc welder or unintended, such as when a tree falls on a power line during a storm creating a current discharge between conductors or to the ground.
An arc fault is an unintended arc created by current flowing through an unplanned path. Arcing creates high intensity heating at the point of the arc resulting in burning particles that may easily ignite surrounding material, such as wood framing or insulation. The temperatures of these arcs can exceed 10,000 degrees Fahrenheit.
Top of page
Why do we really need Arc Fault Circuit Interrupters (AFCIs)?
Smoke alarms, fire extinguishers and escape ladders are all examples of emergency equipment used in homes to take action when a fire occurs. An AFCI is a product that is designed to detect a wide range of arcing electrical faults to help reduce the electrical system from being an ignition source of a fire. Conventional overcurrent protective devices do not detect low level hazardous arcing currents that have the potential to initiate electrical fires. It is well known that electrical fires do exist and take many lives and damage or destroy significant amounts of property. Electrical fires can be a silent killer occurring in areas of the home that are hidden from view and early detection. The objective is to protect the circuit in a manner that will reduce its chances of being a source of an electrical fire.
Top of page
How is an Arc Fault detected?
Unlike a standard circuit breaker detecting overloads and short circuits, an AFCI utilizes advanced electronic technology to “sense” the different arcing conditions. While there are different technologies employed to measure arcs by the various AFCI manufacturers, the end result is the same, detecting parallel arcs (line to line, line to neutral and line to ground) and/or series arcs (arcing in series with one of the conductors).
How does arc fault detection work? In essence, the detection is accomplished by the use of advanced electronic technology to monitor the circuit for the presence of “normal” and “dangerous” arcing conditions. Some equipment in the home, such as a motor driven vacuum cleaner or furnace motor, naturally creates arcs. This is considered to be a normal arcing condition. Another normal arcing condition that can sometimes be seen is when a light switch is turned off and the opening of the contacts creates an arc.
A dangerous arc, as mentioned earlier, occurs for many reasons including damage of the electrical conductor insulation. When arcing occurs, the AFCI analyzes the characteristics of the event and determines if it is a hazardous event. AFCI manufacturers test for the hundreds of possible operating conditions and then program their devices to monitor constantly for the normal and dangerous arcing conditions.
Top of page
How does an AFCI work?
In essence, the detection is accomplished by the use of advanced electronic technology to monitor the circuit for the presence of “normal” and “dangerous” arcing conditions. Some equipment in the home, such as a motor driven vacuum cleaner or furnace motor, naturally create arcs. This is considered to be a normal arcing condition. Another normal arcing condition that can sometimes be seen is when a light switch is turned off and the opening of the contacts creates an arc.
Top of page
Types of AFCIs
AFCIs are intended to mitigate the effects of arcing faults by functioning to de-energize the circuit when an arc fault is detected. AFCIs are required by the NEC® to be a listed product. This means that they must be evaluated by a nationally recognized testing laboratory to the national standard for AFCIs (UL 1699). NEC 210.12 establishes the requirement to use AFCIs. Protection is required for branch circuits in locations as specified in this NEC® rule.
Top of page
Branch/Feeder AFCI
A device intended to be installed at the origin of a branch circuit or feeder, such as at a panelboard. The branch/feeder AFCI provides for detection of arcing faults that can occur line-to-line, line-to-neutral and line-to-ground. To be able to handle shared neutral circuits (a common application in older homes), a two-pole AFCI can be used. This will accommodate the three-wire circuit arrangement used in shared neutral applications.
Top of page
Combination AFCI
In addition to the protection provided by the Branch Feeder AFCI, the Combination AFCI provides for series arc detection down to 5 amperes. This series arc detection is beneficial to detect lower level arcing in both branch circuits and power supply cords. Combination AFCI protection is required by the NEC® as of January 1, 2008.
Top of page
AFCI and GFCI Protection
An AFCI can be used in conjunction with GFCI protection to provide both arcing fault protection as well as 5mA ground fault (people) protection. A common way to provide both types of protection is to use an AFCI circuit breaker and a GFCI receptacle. AFCIs can also incorporate 5mA GFCI protection into the same package. This solution for AFCI and GFCI on the same circuit can be useful where the circuit design requires both types of protection or where the installer (or user) wants to have both types of protection.
Top of page
What is the difference between and AFCI and Ground Fault Circuit Interrupter (GFCI)?
There is a major difference between the functioning of an AFCI as compared to a GFCI (Ground Fault Circuit Interrupter). The function of the GFCI is to protect people from the deadly effects of electric shock that could occur if parts of an electrical appliance or tool become energized due to a ground fault. The function of the AFCI is to protect the branch circuit wiring from dangerous arcing faults that could initiate an electrical fire.
AFCI and GFCI technologies can co-exist with each other and are a great complement for the most complete protection that can be provided on a circuit.
Top of page
Are there any wiring and unstallation guidelines?
There are no special requirements of an AFCI circuit other than proper installation and wiring practices. There are various special considerations that must be given to certain circuits that vary from the norm, such as shared neutral applications, but in general the application of an AFCI is as simple as following the installation instructions that come from the manufacturer.
The basic difference between installing the AFCI versus a standard thermal magnetic circuit breaker is the requirement to connect both the hot and neutral conductor to the proper terminals of the AFCI. In a circuit wired with a conventional circuit breaker, the hot conductor is connected to the breaker and the neutral conductor is connected directly to the neutral bar of the load center.
Top of page
What is the price of the new safety technology worth?
When Ground Fault Circuit Interrupters (GFCIs) were introduced in the 1970s, similar discussions took place regarding the cost/benefit to the consumer, homebuilder and others. GFCIs have been a standard requirement in homes for over 30 years with additional locations and circuits being added over time as well. GFCI also has a statistical track record over time as to the reduction of electrocutions. On an annualized basis, in 1983, there were almost 900 electrocutions total per year with approximately 400 being consumer product related. Ten years later, the total was reduced to 650 annually and slightly over 200 consumer product electrocutions annually.
With over 20 years of history, statistically based analysis of GFCIs was built on a solid foundation of data. AFCIs are new and have only been installed in new construction on bedroom circuits for a few years. As with all products, given time, they too will be able to provide a solid statistical base of measure.
Some have argued that it should be shown how many times an AFCI has ”prevented“ a fire from occurring. Of course, this is not a feasible request. The AFCI disconnects the power when an arc fault occurs, therefore no incidence of fire or arc is reported to authorities. The same can be true when a smoke alarm siren alerts the homeowner and the small smoking event is extinguished without incident. Is that statistic reported to the Federal Government or local fire department? Of course not. Safety prevention is just that ... prevention. The only statistics that are reported are those that have resulted in a fire or a response of a fire department. Many safety protection actions go unreported.
If we are to offer consumers a safer home, then the appropriate technology should be put into place. Removing AFCI as a local or state code requirement is reducing safety requirements. These rules are established by a national body of experts that have heard testimony from many sources as well as reviewed a significant amount of data to make their recommendation. Shouldn’t we trust the safety experts that develop our safety procedures?
Top of page
Why is it important to have an AFCI Breaker installed in your home?
AFCIs were developed in response to an identified electrical problem causing fires in the home as noted by the Consumer Product Safety Commission and other prominent organizations. An AFCI provides a higher level of protection than a standard circuit breaker by detecting and removing the hazardous arcing condition before it becomes a fire hazard.
Top of page
Where are they required to be installed by the National Electrical Code?
The 2005 NEC® states that AFCIs must be placed on bedroom power and lighting circuits. The 2008 NEC® may expand this requirement to other areas in the home. As with all property protection and life saving devices, the ultimate use, beyond the Code, rests with the homeowner. Whether new construction or retrofit, NEMA supports that you utilize the maximum electrical protection level available to reduce the chance of an electrical fire.
Top of page
Can I have AFCIs installed even if my state or municipality doesn’t require them?
Absolutely, do you only place locks on the front door of the house? Just like placing locks on all external doors and windows for security reason, it is logical to request AFCI protection on all 15 and 20A branch circuits, not just those in the bedroom, to protect the entire home from an electrical arcing ignition hazard.
AFCIs are available through electrical distributors and in many home centers and hardware stores nationally. The only major physical requirement is that the AFCI requires directly wired hot and neutral wires on the circuit you’re going to protect.


Toward a 'Green Grid' for Delivering Solar and Wind-Based Electricity

Toward a 'Green Grid' for Delivering Solar and Wind-Based Electricity

After years of neglect, scientists and policy makers are focusing more attention on developing technologies needed to make the so-called "green grid" possible, according to an article in ACS' Chemical Reviews. That's the much-needed future electrical grid, an interconnected network for delivering solar and wind-based electricity from suppliers to consumers

Zhenguo (Gary) Yang and colleagues point out that concerns over the use of coal, oil, and other fuels that contribute to global warming and are in limited supply, have spurred interest in generating electrical energy from clean, renewable resources such as solar and wind power. But solar and wind are not constant and reliable sources of power, since wind power fluctuates from moment to moment and solar power is generated only in the daytime.
This situation poses a significant challenge for electrical grid operators because other power plants need to compensate for this variability and the U.S. power grid currently has little energy storage capability. To enable a significant level of penetration and effective use of renewable energy sources amid growing energy demands, electrical grids of the future will need a low-cost, efficient way to integrate and store this electrical energy, the scientists note.
The scientists analyzed the conclusions of more than 300 scientific studies and identified several technologies that can be used for energy storage for the green grid. These include high-tech batteries now in development that can efficiently store electricity in the form of chemicals and reversible release it on demand. Among the promising technologies are so-called redox flow and sodium-ion batteries, which could provide a low cost, high efficiency way to store energy. In addition to the United States, several other countries such as China and countries in Europe are planning to increase research activities related to energy storage and development.
"The growing interests as well as worldwide research and development activities suggest a bright outlook for developing stationary energy storage technologies for the future electric grid," the article concludes


Storage Power Plant On the Seabed

Storage Power Plant On the Seabed

Norwegian research scientists will contribute to realising the concept of storing electricity at the bottom of the sea. The energy will be stored with the help of high water pressure.

The idea of an underwater pumped hydroelectric power plant may sound like Jules Verne fiction, but then it was hatched by a German engineer who has spent much of his professional life working in aerospace technology.
"Imagine opening a hatch in a submarine under water. The water will flow into the submarine with enormous force. It is precisely this energy potential we want to utilize," explains Rainer Schramm, inventor and founder of the company Subhydro AS to Gemini.no. "Many people have launched the idea of storing energy by exploiting the pressure at the seabed, but we are the first in the world to apply a specific patent-pending technology to make this possible," he adds. He has joined forces with SINTEF in order to realize the concept.
Turbine converts energy
"SINTEF has experts in the fields of energy generation, materials technology and not least offshore and deep-water technology, which means we have all the expertise we need in one place," says the German inventor. To use the water pressure at the sea bed in practice, the mechanical energy is converted by a reversible pump turbine, as in a normal pumped storage hydroelectric plant. "A pumped storage power plant is a hydroelectric plant which can be "charged" up again by pumping the water back to the upper reservoir once it has passed through a turbine. This type of power plant is used as a "battery," when connected to the power grid," the inventor explains. In this pumped storage power plant turbine will be connected to a tank on the seabed at a depth of 400-800 metres. The turbine is fitted with a valve, and when this is opened, water flows in and starts turning the turbine. The turbine drives a generator to produce electricity. One can connect as many tanks as one wishes. In other words, it is the number of water tanks that decides how long the plant can generate electricity, before the energy storage capacity is exhausted.
High degree of storage efficiency
"When the water tanks are full, the water must be removed from the tanks," Schramm explains. This is achieved by running the turbine in reverse, so that it functions as a pump. The process consumes energy from the power grid, just as when one charges an ordinary battery. Although a bit more energy is used to empty the water tanks than can be recovered from flooding them, the degree of efficiency of this type of power plant is just as high as that of a conventional, onshore plant. According to Schramm, calculations indicate an electric storage efficiency of approximately 80 per cent round-trip.
Another advantage of the system is that equipment can be scaled according to users' requirements, both as regards the turbine size and the number of water tanks. A plant of normal size will produce roughly 300 megawatts for a period of 7-8 hours. This is enough energy to supply just over 200,000 British households with electricity for the same time.
"We envisage that this type of storage plant will function well in conjunction with, for example, wind farms. At strong wind conditions, excess electricity is sent subsea to pump water out of the storage tanks. In periods with little wind, energy can be obtained from this underwater plant instead. The same applies to solar generation: the pumped storage power station can contribute to constant electricity production at night time when there is no sunshine to run a solar power plant," says Rainer Schramm.
The deeper the better In addition to the number of tanks, the sea depth also determines the effectiveness of the plant: the deeper the equipment is located, the greater is the pressure difference between the sea surface and the seabed, and the more energy is stored in a single tank. "This is part of the reason why we want to try out the technology in Norway," says Rainer Schramm. In his native country Germany the sea is too shallow for the system to be profitable, but there are many parts of the world where great water depths are located close inshore, such as the marine areas around Italy, Portugal and Spain, as well as North and South America.
Advanced concrete technology
One of the challenges faced by the SINTEF research scientists is to develop a type of concrete which can be used to cast the water tanks which are placed on the seabed. Tor Arne Martius-Hammer at SINTEF Building and Infrastructure is an expert on strong, light concrete types.
"The challenge is to find the optimal balance between strength and cost. If we achieve the goal of creating a concrete which will withstand at least 5 times as high loading as ordinary concrete, we can reduce the wall thickness by 75 per cent. This is a critical factor. We need to reach production and installation costs which make storage of energy economical in relation to the price of electrical energy," Martius-Hammer explains.
One of the solutions SINTEF will work on is reinforcing the concrete with thin steel fibres instead of the normal steel rebar. This will result in a significant simplification of the production process. Concrete is in existence at present which can be used, but our job is to develop a cheaper alternative,"


Thursday, May 16, 2013

Bluetooth Module Interfacing with Microcontroller

Bluetooth Module Interfacing with Microcontroller

Bluetooth® wireless technology is becoming a popular standard in the communication arena, and it is one of the fastest growing fields in the wireless technologies. It is  convenient, easy to use and has the bandwidth to meet most of today’s demands for mobile and personal communications. Bluetooth technology handles the wireless part of the communication channel; it transmits and receives data wirelessly between these devices. It delivers the received data and receives the data to be transmitted to and from a host system through a host controller interface (HCI). The most popular host controller interface today is either a UART or a USB .Here,I will only focus on the UART interface, it can be easily show how a Bluetooth module can be integrated on to a host system through a  UART connection and provide the designer an optimal solution for Bluetooth enabled systems.
Here,I will show two examples of  hardware interface between Bluetooth wireless technology and UART.One example shows an interface between an  Bluetooth module and a PC via UART, and the other example shows an interface between a Bluetooth module and a  Microcontroller via UART.


Supply voltage at VCC  pin can vary between 1.8 V and 3.3 V. VCC and BTEN  combined to a single 3.3 V supply voltage.

Now connect the PC with Bluetooth module through RS232 over MAX232 or MAX233 level converter.
 
Now,Test  the connection with hyperterminal or any serial port communication software .Here,I have used hyperterminal for test.

Hyperterminal settings


- 9600 baud
- no parity
- 8 databits
- no flowcontrol
- 1 stopbit
You can be change this settings via hyperterminal with WT32 bluetooth module command.See more in user guide.

Connect the bluetooth module with microcontroller.Here,I have used PIC16F887 microcontroller.


Now,Test the Communication between PC and Microcontroller Device.You can use the following code that is written in C using mikroC PRO for PIC.

Source Code

char uart_rd;
void main() {
ANSEL  = 0;                     // Configure AN pins as digital
ANSELH = 0;
UART1_Init(9600);               // Initialize UART module at 9600 bps
Delay_ms(100);                  // Wait for UART module to stabilize
while (1) {                     // Endless loop
UART1_Write_Text(“TEST”);
Delay_ms(2000);                  // Wait
}
}

Output

Now,you can be see the Data “TEST” on Hyperterminal that will send by microcontroller via Bluetooth Module.
Hyperterminal


Wednesday, May 15, 2013

Difference between 2G and 3G Technology

Difference between 2G and 3G Technology


Second Generation (2G) technology was launched in the year 1991 in Finland. It is based on the technology known as global system for mobile communication or in short we can say GSM. This technology enabled various networks to provide services like text messages, picture messages and MMS. In this technology all text messages are digitally encrypted due to which only the intended receiver receives message. These digital signals consume less battery power, so it helps in saving the battery of mobiles.
 
The technologies used in 2G are either TDMA (Time Division Multiple Access) which divides signal into different time slots or CDMA (Code Division Multiple Access) which allocates a special code to each user so as to communicate over a multiplex physical channel.
 
3G technology generally refers to the standard of accessibility and speed of mobile devices. It was first used in Japan in the year 2001. The standards of the technology were set by the International Telecommunication Union (ITU). This technology enables use of various services like GPS (Global Positioning System), mobile television and video conferencing. It not only enables them to be used worldwide, but also provides with better bandwidth and increased speed.
 
This technology is much more flexible as it can support 5 major radio technologies that operate under CDMA, TDMA and FDMA. CDMA accounts for IMT-DS (direct speed), IMT-MC (multi carrier). TDMA holds for IMT-TC (time code), IMT-SC (single carrier). This technology is also comfortable to work with 2G technologies. The main aim of this technology is to allow much better coverage and growth with minimum investment.
 
2G vs 3G Technology
Figure: Evolution of Mobile system from 2G to 3G
 
 
Difference between 2G and 3G Technology
·         Cost: The license fee to be paid for 3G network is much higher as compared to 2G networks. The network construction and maintenance of 3G is much costlier than 2G networks. Also from the customers point of view the expenditure for 3G network will be excessively high if they make use of the various applications of 3G. 
 
·         Data Transmission:  The main difference between 2G and 3G networks is seen by the mobile users who download data and browse the Internet on the mobile phones. They find much faster download speeds, faster access to the data and applications in 3G networks as compared to 2G networks. 2G networks are less compatible with the functions of smart phone. The speed of data transmission in 2G network is less than 50,000 bits per sec while in 3G it can be more than 4 million bits per sec.
 
·         Function: The main function of 2G technology is the transmission of information via voice signals while that of 3G technologies is data transfer via video conferencing, MMS etc.
 
·         Features: The features like mobile TV, video transfers and GPS systems are the additional features of 3G technology that are not available with 2G technologies.
 
·         Frequencies: 2G technology uses a broad range of frequencies in both upper and lower bands, under which the transmission depends on conditions such as weather. A drawback of 3G is that it is simply not available in certain regions.
 
·         Implication: 3G technology offers a high level of security as compared to 2G technology because 3G networks permit validation measures when communicating with other devices. 
 
·         Making Calls: Calls can be made easily on both 2G and 3G networks with no real noticeable differences except that in 3G network video calls can also be made. The transmission of text messages and photos is available in both the networks but 2G networks have data limit and the speed of the data transmission is also very slow as compared to 3G.
 
·         Speed:  The downloading and uploading speeds available in 2G technologies are up to 236 Kbps. While in 3G technology the downloading and uploading speeds are up to 21 Mbps and 5.7 Mbps respectively.

How Scientific Calculator works

How Scientific Calculator works


Scientific calculators are more of a habit for any engineer. Loaded with features that can solve complicated trigonometric, logarithmic and exponential equations in just a blink of eye, scientific calculators are nothing less than a pocket sized brain. Let’s find out what makes this small sized gadget tick.
 
Scientific-Calculator.jpg
 
Most of the scientific calculators, irrespective of the manufacturer, come in a hard plastic casing as shown above.  The layout of the buttons is neat and ergonomic so that calculators can be used for long time without posing any risk of strain to the wrist and also ensuring correct key stroke each time, irrespective of the finger size pressing them.
PCB
 
PCB-1.jpg
 
A plastic casing houses the PCB, batteries and the LCD display of the calculator. A double sided PCB is used in a scientific calculator. While one side has the COB IC, the necessary circuitry and connections to the LCD, the other side forms the keypad which contains the tracks that generate signals corresponding to the keys pressed. The rear side of the PCB is shown below.
 
PCB-2.jpg

Processing Core: COB IC or no COB?
 
Processing-Core-1.jpg
 
Using a COB IC is a cost effective feature as it saves significant amount of hardware and carries out all the functions of the calculator but usually takes away the capability of the calculator to be user programmable. This also spells the difference between an ordinary, off the mill pocket calculator used for simple addition and multiplication purposes, and a sophisticated scientific calculator capable of diverse computation. COB ICs are mainly used in those calculators which are non-Programmable while programmable calculators do feature a separate Packaged or Surface mounted microprocessor based IC which are interfaced with external flash memory.
 
Programmable calculators can be instructed to store user defined data and formulas.  The chip would not be visible explicitly in scientific calculators too as that too would look like a COB IC owing to the fact that the chip is covered with a layer of epoxy. A few suitable ICs that have been used in programmable calculators are the 8502 Microprocessor which has been used in HP 35s series of scientific calculators and the ARMv4T chips used in much more powerful calculators which offer graph plotting functionality and support for external memory inputs like memory cards.
Keypad
 
Keypad-1.jpg
 
Shown in the image above is the rear side of the plastic keypad and the PCB. Patterns are drawn on the PCB surface that generate the signal to the corresponding key that is pressed and convey in to the COB IC. The keypad works in the same way as keyboard does. The plastic switches that appear on the casing are connected to a rubber keypad. When the key is pressed, the black rubber mark under the rubber keypad touches the PCB and completes the track for signal transmission.
LCD Display
 
LCD-Display.jpg
 
As per the features provided in the calculator, LCD screens of the calculator can be of various sizes and type. While a simple calculator has a 16X2 LCD display, the ones enabled with advanced features have a LCD dot matrix display too. High end scientific calculators even have a colourful display.
 
Shown in the image above is a two line display LCD. Top line is a LCD dot matrix display while the lower part is LCD display using seven segment digits. The LCD is connected to the PCB with the aid of heat seal connector. A heat seal is a light connector made out of polyester film. Two layers of polyester films are adhered (sealed) togetherat high temperature, using a conductive paste, thus the name heat seal.
BATTERY
 
BATTERY.jpg
 
The type of batteries used depends on the calculator’s features. More the features or bigger the LCD display, more powerful the battery should be. Shown above is an AA pencil cell combination that gives power to the calculator. Button cell or “AAA” batteries are also used in many calculators. Average life of such a battery pack is 1-2 years (though it varies with each battery type and from calculator to calculator). Adding a solar panel enhances the battery life so that the reason for replacing the calculator is not the dying out of the batteries, but something else like physical damage due to dropping it from a height. Moreover, calculators run on very low power and do not run dry that easily.  In order to consume least possible battery power, calculators have an Auto Power Off feature. This feature is managed by “Power Control Consumption System” which switches the calculator off when no key is pressed for certain duration. Usually this time is 7-9 minutes and if calculator is in middle of any calculation (which usually does not happen), it saves the data for ease of the user.

The first scientific calculator was released in late 1960s by Hewlett Packard and numerous electronic manufacturers followed suit. Initially expensive and feature restricted, engineers have continually crammed more and more features into that little space as the semiconductor manufacturing industry continues to mature.


Tuesday, May 14, 2013

DC Motor Interfacing With Micrcontroller

DC Motor Interfacing With Micrcontroller

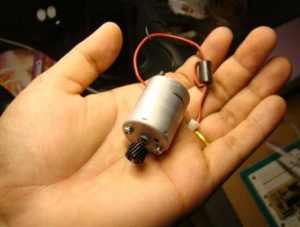
DC Motors are small, inexpensive and powerful motors used widely in robotics for their small size and high energy out. A typical DC motor operates at speeds that are far too high speed to be useful, and torque that are far too low. Gear reduction is the standard method by which a motor is made useful .Gear’s reduce the speed of motor and increases the torque.
Choosing a DC Motor Depends on application.Prefer following:
  • DCMotor with Gear head
  • Operating voltage 12V
  • Speed


  •  


Drive basics of DC Motor

Red wire Black wire Direction of rotation
Positive Negative Clock wise
Negative Positive Anti clock wise
Logic Logic Direction
1 0 Clock
0 1 Anti clock
Direction Pulse to
Clock wise A and C
Anti Clock wise B and D

Bi-Direction control of DC Motor

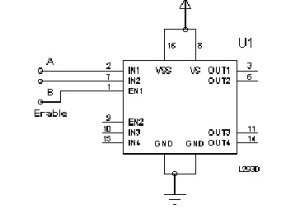
H-Bridge Circuit using transistors for bidirectional driving of DC motor. H-Bridges in IC’s to reduce the drive circuit complexity . L293D is a dual H-Bridge motor driver, So with one IC we can interface two DC motors which can be controlled in both clockwise and counter clockwise direction and if you have motor with fix direction of motion the you can make use of all the four I/Os to connect up to four DC motors. L293D has output current of 600mA and peak output current of 1.2A per channel. Moreover for protection of circuit from back EMF ouput diodes are included within the IC. The output supply (VCC2) has a wide range from 4.5V to 36V, which has made L293D a best choice for DC motor driver.
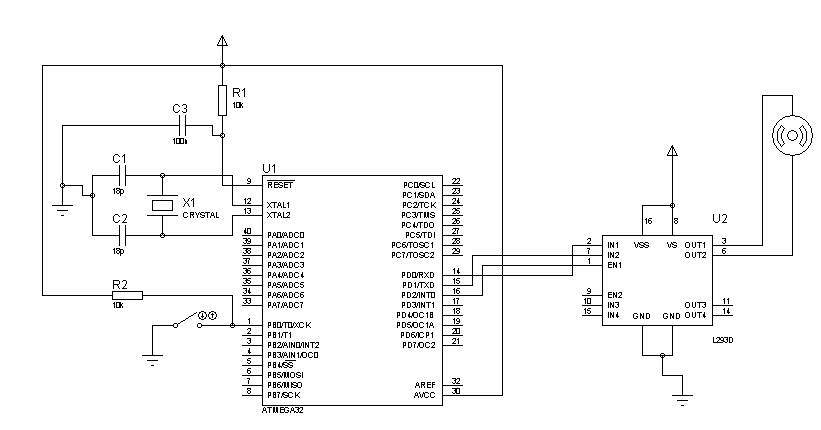
As you can see in the circuit, three pins are needed for interfacing a DC motor (A, B, Enable). If you want the o/p to be enabled completely then you can connect Enable to VCC and only 2 pins needed from controller to make the motor work.
**To Move the motor Clockwise And Anticlockwise,Must be use two separate Power source,one for microcontroller and another for driving motor with Driver IC.
Here,i have used ATMEGA32 micrcontroller and  Code is written in C  using AVR Studio 5.0.

Source Code

/*
* DCMotorControl.c
*
* Created: 4/1/2011 12:08:10 AM
*  Author: sfg
*/
#include <avr/io.h>
#include <util/delay.h>
int main(void)
{
DDRD=0xFF; //PORTD declared as output
PORTD=0×00;
DDRB=0×00; //PORTB as input
while(1)
{
//Pin 0 of PORTB high,then Moves Clockwise
//A–1–PD0
//B–0–PD1
//Enable–1–PD2
if(PINB==0×01)
{
PORTD=0×05;
//_delay_ms(5000);
}
//Pin 0 of PORTB Low,then Moves AntiClockwise
//A–0–PD0
//B–1–PD1
//Enable–1–PD2
else
{
PORTD=0×06;
//_delay_ms(5000);
}
}
}

http://vshamu.files.wordpress.com/2011/04/dcmotorcontrol.jpg